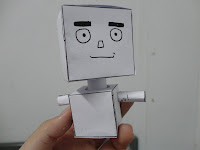
The past article, i speak to make a basic papercraft. today, i will apply this to make something. It is a robot(?). lol Firstly, i will draft a robot. That looks like this picture. And when i get a prototype of papercraft. i will begin to do a papercraft now.
Before to do, i will see a prototype. Separate a robot and think about number ,shape and size. And i summary the component of this robot as follow.
 It has component around 7 part (12 pieces)
------------------------------------------------------------------------------------------

Cutting and link a parts together. i will begin to make a neck and head. Assembling a head and neck ( gluing on a black area). when you get this two component , you hold a neck and insert it to a hole in a head. Ah! don't forget to add a eyes, eyebrows , nose and mouth.
 And then make a body Oh! the component (in above) i forget to make a hole for shoulders. You can see in this picture.
 When you get a hole for shoulders. you will make a shoulder and trunk. If it completes, you can insert a neck and shoulders to a hole at a trunk.
Due to, a neck is so long, i will shorten it.
Making a hole that fit with a leg at a feet. Sticking a leg to a trunk and insert it at a hole of feet. Only little step you can make the robot.
His arm, head and feet can rotate. Oh! and you can decorate it can't do because i use a4 paper to do. If i paint color, paper must tear lol. Uh triangle pyramid on a head i don't teach it again. you can go to basic papercraft. Okay make papercraft finish. Have a question can comment it all time. Now bye!!


No comments:
Post a Comment